
- You do not have permissions to view this page - please try logging in.
內容表格
- 1. 卡的安裝
- 2. 下載/安裝需要的套件及檔案
- 3. 卡的驅動及設定
- 4. 偵測卡的狀態及驅動設定
- 5. 整合 Elastix 管理的設定
- 5.1. Outbound 設定
- 5.2. Inbound 設定
- 6. 進階的技巧
- 7. F.A.Q
教學目的:安裝 G400P 卡在 Elastix 系統上。
系統環境介紹:
- Elastix 1.6-12, PIAF-GOLD
- G400P (SIM card x2)
- 一般舊 PC: Intel(R) Celeron(TM) CPU 1000MHz/256MB
- 台灣大哥大的 2G SIM card(NOTES:請不要使用 Vibo 的 SIM card)
卡的安裝
- 插入 PCI Slot
- 接上原廠附的短天線
- 接上 12V 電源,手冊上說明有兩種供電方式,內接電源及外接電源,若是安裝在一般 PC 主機,使用內接電源,也就是接上硬碟的電源接頭即可。
注意:預設 Jumper 是設在內接電源模式(1),若要使用外接電源,必須調整為 2,如下圖示。
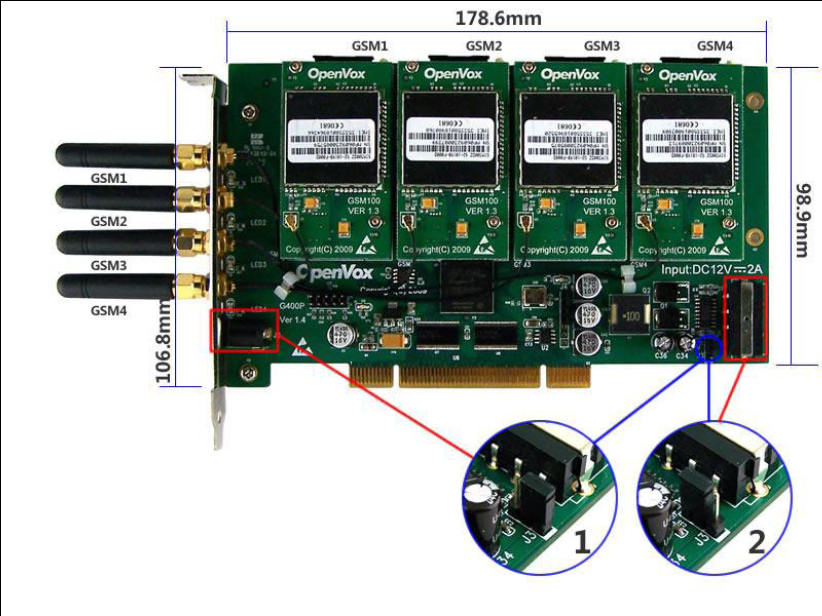
Tips:
使用指令 lspci -vvvv,可以檢查主機是否有偵測到這張卡,若系統正確偵測到時,會顯示以下的訊息:
00:09.0 Class ff00: Unknown device 1b74:0100 (rev 01)
        Subsystem: Unknown device 1b74:0104
        Control: I/O- Mem- BusMaster- SpecCycle- MemWINV- VGASnoop- ParErr- Stepping- SERR- FastB2B-
        Status: Cap- 66MHz- UDF- FastB2B- ParErr- DEVSEL=slow >TAbort- <TAbort- <MAbort- >SERR- <PERR-
        Interrupt: pin A routed to IRQ 255
        Region 0: Memory at f5000000 (32-bit, non-prefetchable) [disabled] [size=64K]
下載/安裝需要的套件及檔案
// 檢查需要的所有其他套件
# rpm -q bison bison-devel ncurses ncurses-devel zlib zlib-devel openssl openssl-devel gnutls-devel gcc gcc-c++

bison-2.3-2.1
package bison-devel is not installed
ncurses-5.5-24.20060715
ncurses-devel-5.5-24.20060715
zlib-1.2.3-3
zlib-devel-1.2.3-3
openssl-0.9.8e-12.el5
openssl-devel-0.9.8e-12.el5
package gnutls-devel is not installed
gcc-4.1.2-44.el5
gcc-c++-4.1.2-44.el5
出現 is not installed 的項目,都要作安裝。
// 使用 yum 線上安裝套件
# yum install bison-devel gnutls-devel
//
卡的驅動及設定
由於 G400P 的驅動程式需要透過官方提供的腳本 opvx-bristuff-0.4.0-RC3h.tar.gz 來安裝,而此安裝過程會重新編譯/安裝另一套的 asterisk, asterisk-addons, zaptel, libpri,因此對於 Elastix 系統來說,要驅動此卡,必須強制覆蓋原有的這些套件,雖然這樣的方式不是很好,但除非 Elastix 以後可以將此卡列入官方的硬體支援列表。
NOTES:
這個腳本會強制安裝以下軟體及版號:
- zaptel-1.4.12.1
- libpri-1.4.3
- asterisk-1.4.26.2
- asterisk-addons-1.4.7
// 下載 opvx-bristuff-0.4.0-RC3h.tar.gz
# wget http://downloads.openvox.cn/pub/drivers/bristuff/g400p/opvx-bristuff-0.4.0-RC3h.tar.gz
# tar xzf opvx-bristuff-0.4.0-RC3h.tar.gz
# cd opvx-bristuff-0.4.0-RC3h
// 開始編譯及安裝
NOTES: 以下步驟將會需要從網路下載檔案,所以請先確定網路是暢通的!
# amportal stop
# service dahdi stop ;若是 PIAF,請改用 zaptel。
# mv /usr/lib/asterisk /usr/lib/asterisk_orig
# ./install.sh
約數十分鐘後,會出現幾次的詢問 "Press <Enter> to continue, or <CTRL> + <C> to abort."
按下 Enter ,繼續後續的流程。
其中會詢問是否安裝 iLBC codec,請自行決定即可。
// 設定自動啟動
# cd zaptel-1.4.12.1
# make config
# vi /etc/sysconfig/zaptel

加上這兩行,並註解所有用不到的模組
MODULES="$MODULES opvxg4xx"     # G400P GSM Card
MODULES="$MODULES ztdummy"      # Zaptel Timing Only Interface
Notes:
* 請不要 cd asterisk; make sample,這樣會覆蓋所有 Elastix 的設定檔。
// 關閉 dahdi 的啟動服務;若是 PIAF,請忽略此項。
# chkconfig dahdi off
偵測卡的狀態及驅動設定
// 卡的設定
編輯 /etc/zaptel.conf
loadzone=tw
defaultzone=tw
alaw=1,3,5,7
span=1,1,3,ccs,ami
span=2,2,3,ccs,ami
span=3,3,3,ccs,ami
span=4,4,3,ccs,ami
bchan=1,3,5,7
dchan=2,4,6,8
編輯 /etc/asterisk/zapata.conf
[channels]
txgain=0.0
rxgain=0.0
signalling=gsm
context=from-gsm
echocancel=no
relaxdtmf=yes
; slot A
channel => 1
; slot B
channel => 3
; slot C
channel => 5
; slot D
channel => 7
變更權限為
# chown asterisk:asterisk /etc/asterisk/zapata.conf
// 以上步驟都完成無誤後,請執行重新開機即完成所有設定。
// 檢查卡的硬體狀態
# dmesg

....
Zapata Telephony Interface Registered on major 196
Zaptel Version: 1.4.12.1
Zaptel Echo Canceller: MG2
PCI: Enabling device 0000:00:09.0 (0000 -> 0002)
ACPI: PCI Interrupt Link [LNKD] enabled at IRQ 11
ACPI: PCI Interrupt 0000:00:09.0[A] -> Link [LNKD] -> GSI 11 (level, low) -> IRQ 11
Found an OpenVox G400P: Version 0.8e79
opvxg4xx: slot 0 is Installed
opvxg4xx: slot 1 is Installed
opvxg4xx: slot 2 is Empty
opvxg4xx: slot 3 is Empty
opvxg4xx: Powering up all spans...

# ztcfg -vvvvvv

Zaptel Version: 1.4.12.1
Echo Canceller: MG2
Configuration
======================

SPAN 1: CCS/ AMI Build-out: 399-533 feet (DSX-1)
SPAN 2: CCS/ AMI Build-out: 399-533 feet (DSX-1)
SPAN 3: CCS/ AMI Build-out: 399-533 feet (DSX-1)
SPAN 4: CCS/ AMI Build-out: 399-533 feet (DSX-1)

Channel map:

Channel 01: Clear channel (A-law) (Slaves: 01)
Channel 02: D-channel (Default) (Slaves: 02)
Channel 03: Clear channel (A-law) (Slaves: 03)
Channel 04: D-channel (Default) (Slaves: 04)
Channel 05: Clear channel (A-law) (Slaves: 05)
Channel 06: D-channel (Default) (Slaves: 06)
Channel 07: Clear channel (A-law) (Slaves: 07)
Channel 08: D-channel (Default) (Slaves: 08)

8 channels to configure.

# cat /proc/interrupts

           CPU0
  0:   92720937          XT-PIC  timer
  1:          2          XT-PIC  i8042
  2:          0          XT-PIC  cascade
  4:       5520          XT-PIC  serial
  7:          0          XT-PIC  parport0
  8:   94901916          XT-PIC  rtc
  9:          1          XT-PIC  acpi
 10:   92692060          XT-PIC  opvxg4xx
 11:     148485          XT-PIC  uhci_hcd:usb1, uhci_hcd:usb2, CMI8738, eth0
 12:          4          XT-PIC  i8042
 14:     107020          XT-PIC  ide0
Notes:
* 檢查 IRQ 時,若 opvxg4xx 不是單獨的一項(以上的範例)時,表示 PCI卡有 IRQ衝突,請更換其他的 PCI Slot。
// 檢查 SIM 卡的網路註冊
# asterisk -rvvvvvvvvvvv

CLI> gsm debug channel 1
CLI> gsm show status 1
    -- GSM Span 1 registered to network!
Tips:
* 可用的 Channel NO. 為 1,3,5,7,可以用指令 gsm debug channel x 來驗證,若 channel 無效時,會提示:
No GSM running on channel 2* SIM card 順序 - Channel NO - Span NO. 的對應
SIM x1 - Channel 1 - Span 1
SIM x2 - Channel 3 - Span 2
SIM x3 - Channel 5 - Span 3
SIM x4 - Channel 7 - Span 4* 若 SIM card 尚未開通、收不到訊號及非 GSM 系統(不支援 3G 的系統),status 會一直出現:
GSM 1: < +CREG: 2 , 8 >
GSM 1: < +CREG: 0 , 8 >
整合 Elastix 管理的設定
在筆者測試的時候,官方的資訊是不支援 Elastix 版本,雖然在論壇上能找到一篇有關在 Elastix 安裝此卡驅動程式的教學,但對於 Elastix 如何管理此卡的教學並沒有交待清楚,所以筆者在驅動程式安裝之後,始終無法透過原有的 UI 做好 Inbound 及 Outbound 的管理設定,不過,好在 FreePBX 有著高度可客製化的彈性設計,琢磨幾個小時後終於搞定了。
雖然 G400P 目前不直接支援 Elastix(我相信爾後官方對此會有改善),但透過這段教學,管理員只要多作幾個步驟,就可以利用原有的 UI 對卡的 Inbound/Outbound 做好管理工作,就好像使用那些 A400P 卡那樣。
Outbound 設定
// Trunk
Elastix UI > PBX > PBX Configuration > Trunks > Add Custom Trunk
Custom Dial String = Zap/1/$OUTNUM$
// Route
Elastix UI > PBX Configuration > Outbound Routes > Add Route
Route Name = <whatever name>
Dial Patterns = 008|.
Trunk Sequence = Zap/1/$OUTNUM$
// 撥出的方式
008 + 電話號碼
Inbound 設定
編輯 /etc/asterisk/extensions_custom.conf,增加以下內容:
; This is for inbound calls with G400P GSM card
[from-gsm]
exten => _X.,1,Set(DID=${EXTEN})
exten => _X.,n,Goto(s,1)
exten => s,1,Noop(Entering from-zaptel with DID == ${DID})
exten => s,n,Ringing()
exten => s,n,Set(DID=${IF($["${DID}"= ""]?s:${DID})})
exten => s,n,Noop(DID is now ${DID})
exten => s,n,GotoIf($["${CHANNEL:0:3}"="Zap"]?zapok:notzap)
exten => s,n(notzap),Goto(from-pstn,${DID},1)
exten => s,n,Macro(Hangupcall,dummy)
exten => s,n(zapok),Noop(Is a Zaptel Channel)
exten => s,n,Set(CHAN=${CHANNEL:4})
exten => s,n,Set(CHAN=${CUT(CHAN,-,1)})
exten => s,n,Macro(from-zaptel-${CHAN},${DID},1)
exten => s,n,Noop(Returned from Macro from-zaptel-${CHAN})
exten => s,n,Goto(from-pstn,${DID},1)
exten => fax,1,Goto(ext-fax,in_fax,1)
存檔後,執行指令套用:
#asterisk -rx "dialplan reload"
//新增 DID 對應 SIM card
Elastix UI > PBX > PBX Configuration > Unembedded freePBX > Zap Channel DIDs >
Channel = 1
Description = gsm1-did
DID = <第一張 SIM 卡的手機號碼>
// Inbound Route
Elastix UI > PBX > PBX Configuration > Inbound Routes
Description = gsm1
DID Number = <第一張 SIM 卡的電話號碼>
Set Destination =<whatever you wanted>
進階的技巧
// 開啟除錯模式
# modprobe opvxg4xx debug=8
# amportal stop
# amportal start
# dmesg
//升級卡的 firmware
必要時可以下載最新的 firmware 作升級
下載最新 firmware: http://downloads.openvox.cn/pub/firm...0100612.tar.gz
下載 升級 firmware 工具:http://downloads.openvox.cn/pub/driv...s-1.0.0.tar.gz
# amportal stop
# modprobe -r opvxg4xx
# modprobe opvxg4xx burn=1
# tar opvx-epcs-1.0.0.tar.gz
# tar -xzf opvx-fw-g400p-20100612.tar.gz
# cp g400p.bin opvx-epcs-1.0.0
# cd opvx-epcs-1.0.0
# ./epcs
輸入 g400p.bin
F.A.Q
Q: 無法啟動 Asterisk 服務?
A: 請檢查卡的設定是否正確。
Q: 錯誤訊息:ERROR[3130] codec_dahdi.c: Failed to open /dev/zap/transcode: No such file or directory
A: 編輯 /etc/sysconfig/zaptel,加上這行:
MODULES="$MODULES zttranscode" # Zaptel Transcoding
Q: 比較新版的 Asterisk,如何安裝此卡?
A: 請參閱:OpenVox G400P User Manual for dahdi
- Was this page helpful?
- 標籤 (Edit tags)
- 什麼連接到這裡
文件 1

| 文件 | 大小 | 日期 | 附件上傳者 | |||
|---|---|---|---|---|---|---|
| g400p_hw_powerconnector.png 無描述 | 575.39 KB | 16:06, 8 Jul 2010 | alang | 動作 | |
| Images 1 | ||
|---|---|---|
 | ||